Ssh. Is anyone looking over your shoulder? No? Good. Because this is my secret garlic bread. This is not your everyday garlic bread, nor will it garner an everyday garlic bread response. I would suggest making this with 2 baguettes if you live with or plan to serve this to any carb or garlic lovers. It's a secret for many reasons. I never tell people at get-togethers what's in it because I don't want them to poo poo it before they try it. None of my friends know its secret, and even though it's obvious to me, they've never guessed it. Its also a secret because it is a weapon I use against others occasionally. 'Fine, but I won't make the garlic bread ever again!' 'Wait, wait, wait...okay fine, we can go to the yarn store...again'.
Do you know someone who's a little...picky? Do you know a mayonnaise phobic? Well, don't tell them what's in this. Because....there is mayonnaise involved. Not a lot, but just enough to make the topping more than just a toasted butter deal, and enough to give it just a little tangy that is unexpected and delicious. Alleged mayonnaise haters have gobbled this bread down like no tomorrow, trust me, they can't tell. But if you tell them, you will get an undesired reaction. So do yourself, and them a favor. What they don't know will make them so happy and will make you a garlic bread star.
If for some ungodly reason you have extra topping leftover, save it in the fridge and find a reason to eat corn on the cob because it is dead delicious on a bright yellow, piping hot, grilled, boiled or steamed cob.
Super Secret Garlic Bread
covers 1 baguette
Ingredients:
1 baguette, cut lengthwise in half
**1 tbsp mayonnaise
2 tbsp butter
1 tbsp grated parmesan cheese
1 1/2 tbsp olive oil
1 1/2 tbsp minced garlic
1/2 tsp oregano
1/2 tsp thyme
salt to taste
** if you are seriously, morally opposed to mayonnaise. Or, like me, can't find it very easily, you may beat 1 egg, then use 1 tablespoon of the beaten egg in the mix. It will be delicious, but not quite the same delicious as with the mayo. HOWEVER, do not add it until after Step 1 or spreadable it will not be.
Directions:
1. Melt the butter with the mayonnaise in the microwave. The mayo curdles a little, but it helps, trust me.
2. Mix in the rest of the ingredients.
3. With a spoon or brush, coat the cut sides of the baguette with the topping. Really get it all on there good.
4. Put your bread in the oven to bake at 350F until the top is toasted and a little bubbly. Maybe 10 minutes, but keep an eye on it.
5. When it's all bubble, take it out and let it sit for a minute or two. Cut into pieces and serve with pasta, chicken, soup, salad or anything!
Monday, February 27, 2012
Friday, February 24, 2012
How To: Blanch Fresh Tomatoes

Why, you ask, would you ever need to know how to blanch and peel a tomato? Well, if you're like me, you might live in a place where you can't buy canned tomatoes, or they are very expensive. Many posts on this site will deal specifically with my solutions to lacking ingredients or ready made products here in the land of China. Maybe you can get canned tomatoes, but have started reading about the problems with canned tomatoes and leeching chemicals. Maybe you have a garden full of fresh tomatoes that you'd like to use for a sauce (summer is coming..someday). If you're going organic, it's less expensive and easier to control what substances you eat by just buying organic tomatoes and making fresh sauce. Maybe you hate the weird little curls of cooked tomato skin you get when you just cut up a tomato for sauce. Here is your answer
What is blanching? It's the process of putting something, usually fruits or vegetables, in boiling water for just a short time, usually to peel the skin off it. It's as easy as it sounds. Despite this, people would rather spend those 5-7 minutes opening a can of questionable tomatoes. I tell you, this is easy and delicious.
Here are the steps (pictures are on the way):
How To Blanch Fresh Tomatoes
1) Gather all the tomatoes you want to take the skins off of. Get a pot, like a pasta water pot, and fill it with enough warmish water from the tap to just cover the tomatoes. Also scrounge up a slotted spoon or ladle, just something to eventually scoop the tomatoes out of the water. Turn your burner on to boil the water.
1) Gather all the tomatoes you want to take the skins off of. Get a pot, like a pasta water pot, and fill it with enough warmish water from the tap to just cover the tomatoes. Also scrounge up a slotted spoon or ladle, just something to eventually scoop the tomatoes out of the water. Turn your burner on to boil the water.

2) Take any leaves and stems off the tomatoes. Put them stem side down on a cutting board. With a sharp knife, score an X on the bottom of the tomato. By score, I mean to cut, but only just through the skin, you're just helping it to split later in the water. Do not cut into the actual meat of the tomato or you'll lose some precious tomatoey flavor to the boiling water.

 3) Once the water is at a rolling boil, add the tomatoes, careful not to splash yourself! Now, you wait. Probably around 5-7 minutes. You don't want to mushify the tomatoes. The goal here is to get the very outside of the meat to cook, the part attached to the skin. The X you put on the bottom will help water to slightly flow in there. You know they're ready when the skin has split from your X up to other parts of the tomato. At this point, turn your water off and retrieve your tomatoes with the slotted spoon or ladle.

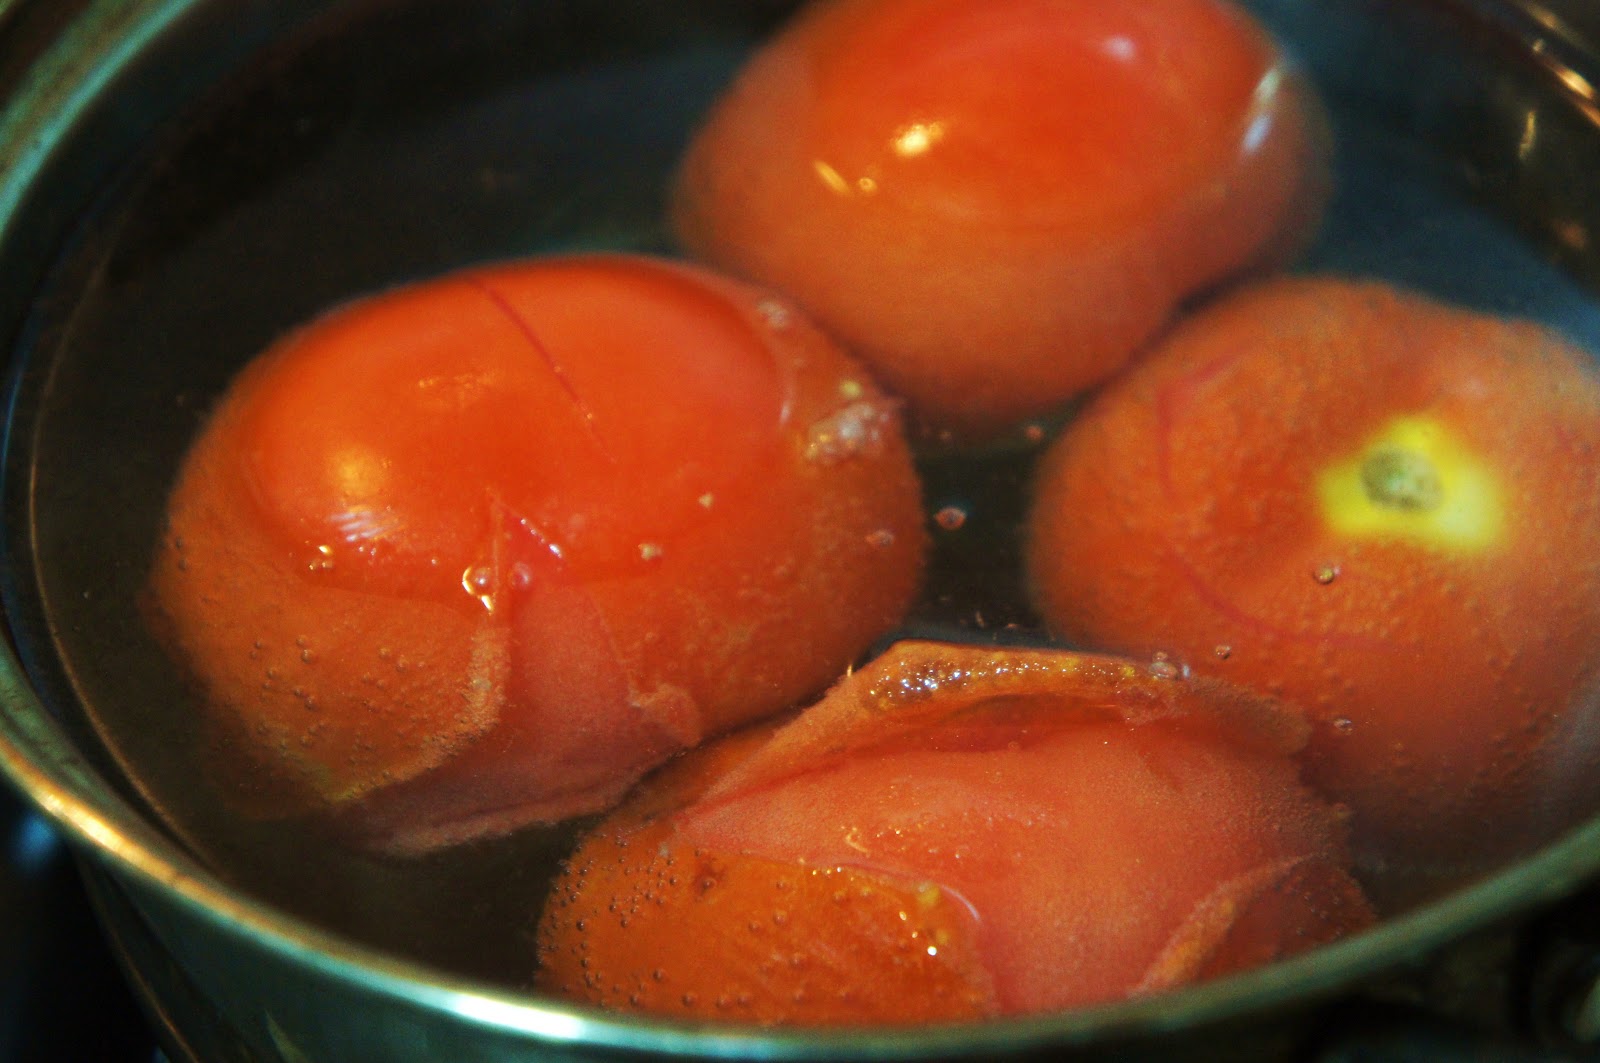


4) Wait about 2 minutes, maybe more, for the tomatoes to cool enough for you to handle them. Once cool, use the handy little flaps you made earlier and peel the skin off!
5) Ta da! You are finished and have peeled tomatoes that you can use in sauces, soups, salsas, pasta, Bloody Mary's or whatever! I'd highly recommend doing this with garden fresh tomatoes and making Pasta Pomodoro with them!
Thursday, February 23, 2012
The Banana Bread
 |
| Meet The Banana Bread |
Yes, I do mean to imply that there is only one. That’s because there is only one banana bread recipe that will ever have my heart. The Banana Bread is the only banana bread I have eyes for. I have no recollection of where I originally found the base recipe for this. Likely on a large cooking database like allrecipes, which has its moments. It was my freshman year of college, and because I’m sometimes a kitchen klutz (this you will find out about me), I was not successful in putting in the required ingredients in their correct amounts. This is the first recipe I ever fiddled with, though accidentally. I wrote it down immediately after the entire bread was gobbled up by deprived and hungry students at 11pm in under 10 minutes, while it was still hot even! So as my first post here, I think it’s appropriate to honor my first great success with culinary creative license.


I’m not sure what your banana bread standards are, but if you like a moist, dense, but not too dense, sweet, but not too sweet, super bananay, spicy, fiddle-able bread, this is it. I think it only gets more delicious with time, as the moisture from the bananas really saturates it. I’ve tried it with a cup of pineapple, which was a dead ringer for pineapple upside down cake. I’ve mixed in blackberries for a structurally sound loaf of what tasted like berry cobbler. It doesn't care if it's baked in a full fledged oven or my dinky toaster oven here in China. In my more desperate times, I’ve even healthed it up with flax seed and by replacing part of the butter with yogurt. When I’m feeling wild, I replace the vanilla with brandy, mix half a bar of melted dark chocolate with some cream cheese, spread it on while it’s hot and later have something that I have to hide from others. My boyfriend ate an entire loaf of that last incarnation by himself just yesterday. Now that I live in China, and butter is a magical unknown substance here, I use vegetable oil.
 |
| Good to the last crumb! |
The Banana Bread
Makes 1 lovely loaf
Ingredients:
1/2 cups softened, room temperature butter salted or unsalted, I use salted
(china-fied: or, you may substitute 6 tbsp vegetable oil)
1 1/3 cups sugar (white or brown is fine, or a combination, experiment!)
2 cups all-purpose flour
1 1/2 tsp baking powder
1 tsp baking soda
2 eggs
1 tsp salt (or slightly less if using salted)
1/4 cup milk
1 tbsp vanilla extract (or, you know, booze of some sort, like brandy)
3 or 4 mashed, old, spotted, left-for-dead bananas
1 cup of add-ins like chocolate chips, fruit, craisins, or nuts (optional)
Your choice of spices, to taste
Directions:
Preheat your oven to 350 F (175 C), making sure your rack is in the middle position. Assemble your ingredients on the counter. Prepare your normal sized loaf pan, 12 muffin muffin pan, or 3-4 mini loaf pans by greasing, paper lining or greasing respectively.
Blend together the butter (or oil) and sugar. Once the butter is fluffy and creamy looking, add the banana, stir. Add the eggs, stir. Add the milk and vanilla (or booze), stir.
In a separate bowl, (and I'm serious, there is nothing worse than getting a lump of baking soda in a bite of your delicious bread) mix the dry ingredients with a fork to combine and smooth out any little lumps.
Add the dry ingredients to the wet. Stir until just combined, don't overwork it or you'll tire it out too much to rise in the oven. Here is where you will add your spices or orange zest, and can add your 1 cup fruit, nuts, chocolate chips, or anything else you want. Don't exceed one cup of extra material though, or it will cook funny. I regularly use about 3/4 tbsp of pumpkin pie spice, but nutmeg and cinnamon do the trick too, or just cinnamon, or nothing at all. It's a choose your own adventure sort of bread.
Scrape all that goodness into your desired bread form, smooth it out a little. In a loaf pan, don't fill it up more than 3/4 of the way full. It rises, and you don't want sad burning banana goo on your oven floor. Likewise, don't fill up your muffin cups more than half way or so, or you'll have sad spilly outy muffins and sad crusty muffin pan.
Now, pop that bread into your preheated oven. Bake for around 35-45 minutes for a loaf, or 25-30 for mini loaves and cup cakes. It will turn a golden brown, and a thin, sharp knife will come out clean after being inserted in the middle of the loaf (or muffin).
Take it out, and let it cool for 5 minutes in the pan (wait for it...). If you get too antsy, it'll stick to your pan and be sad. Just wait. Now, run a butter knife gently around the edges to release it from the pan, pushing very gently towards the center of the pan to really release the bottom. Put a plate on top, flip the whole thing over and gently shake your bread out of the pan (this step always makes me think of getting condensed soup or refried beans out of a can). Flip your bread right side up on its new plate home, and bask in the glory. Now, eat it. Toasted, frosted, buttered, warm, cold or as is, it's delicious. Enjoy!
I'd love to hear what sort of combinations you come up with! Post them in the comments!
Tuesday, February 21, 2012
Changes & Beginnings
I had a food blog one time. One that I didn't keep up. One that I took pictures for with my cruddy (though red) camera. I am an avid and rabid reader of many food blogs. I rely on them for inspiration on both busy and lazy days. Usually though, I absorb information from them, like the basic method of preparing a dish, or to file away new spice and ingredient combinations into the brain vault I have for those things. The brain vault is filling up.
Lately, I've felt that my cooking has come into its own. And, I've felt creatively inspired, in part thanks to a change in scenery (read my About Me page for more info on that) and in part to the ingredients I have (and don't have) available to me now. Kama Foodtra is the answer. My hope is that it will be a space for me to record successes and failures, and an inspiration and motivator for me to up my game. Check back soon for more information and cooking!
Subscribe to:
Posts
(
Atom
)