Sunday, May 29, 2016

Triple C Salad- Cabbage, Chicken & Chipotles

I'm sitting at my desk, watching the clock. It's 4 minutes to lunch, and I'm excited to open my lunch box and dig in.

I love what I packed for lunch today. Love. It.

Today, I've got my favorite salad waiting for me in the fridge.

This is less of a recipe, and more an invitation to put these things together in your mouth. Soon.

Ingredients:
Cabbage
Arugula if you want
Chicken (poached, boiled, rotisseried, or grilled)
Cilantro
Pepitas (hulled pumpkin seeds)
Green onions
Avocado
Queso fresco (optional)
Tomatoes (optional)

Dressing
Canned chipotles
Balsamic vinegar
Olive oil
Honey (only a little)
Salt

Take a cabbage (I like purple because it's pretty, plus antioxidants), and cut it in half. Then, cut the half in half again. You now have a quarter. Cut out the tough core of the cabbage. Now, going perpendicular to the leaves, slices the cabbage into thin ribbons.

Slice, dice, or shred chicken, however you prefer.

Slice the avocado.

Chop green onions.

Chop some cilantro.

In a small bowl, pour 1 teaspoon of chipotle adobo sauce (and a little chile if you like it spicy), 1 teaspoon of balsamic vinegar, and 1 tablespoon olive oil, and mix well. Mix a tiny bit of honey, some chopped cilantro, and a pinch of salt to round out the flavor. This dressing has kick - adjust to your own tastes!

Chop one chipotle pepper finely

Now, in a bowl, add the amount of cabbage (plus arugula if using) you want to eat and add green onions, cilantro pepitas and tomatoes, if using.  Add the amount of dressing you like and stir to coat cabbage. Top with chicken, avocado, a sprinkle of queso fresco (if using) and some additional chopped chipotle peppers if you can take the heat.

So good.


Monday, January 19, 2015

Simple Eggs with Chive & Potato Pancakes

Each morning before elementary school, I was plunked down in front of a bowl of oatmeal or cereal. Lucky Charms, Kix, Smacks, Quakers with brown sugar and butter. I couldn't complain. When it came time for annual standardized testing, though, no sugary carbs were on the menu. On those mornings, my dad would make me a fried or scrambled egg and a piece of buttered toast. I'd drown it in hot sauce and enjoy every last bite. Clearly, my father's intention was to make the day seem special, to start it off on the right foot, with a breakfast of champions. And I must say, it worked. The positive attitude that my dad and those egg breakfasts implied made me immune to test anxiety. I never felt nervous, and I always did well. Now, before big meetings, job interviews, presentations or any time I need a boost of 'the day is yours!', I fry or scramble an egg, butter a piece of toast, drown it all in hot sauce and feel less nervous.

I like eggs all forms of eggs (well... except for crunchy, hard meringue cookies). Omelets, scrambles, quiches, Spanish tortillas, fried, poached, boil or deviled. I could eat eggs any time of day, breakfast, lunch and dinner. This form of eggs for breakfast seems decadent and a little special, but is simple enough not to feel fussy.

So, next time you make eggs for breakfast, try eating them this way- lightly fried in olive oil with thin, hashbrowny, flourless, potato and chive 'pancakes' and a little hot sauce or a small dollop of sour cream or plain yogurt, and fresh cracked pepper. Serve with orange slices, coffee or tea. 

(Added bonus, each thin, little pancake is only about 85 calories!)

Ingredients:
(serves 4)

1 large, waxy potato
1 small bunch of chives (about 3 tablespoons when chopped)
4 tbsp Olive oil
1 tbsp Butter
Salt & pepper
4-8 Eggs

Toppings (optional):
Plain yogurt or sour cream
Hot sauce (I like Tapatio)
Chopped parsley 
Cooked spinach (like I make for Eggs Florence)


Directions:
  1. Wash the potato of any lingering dirt. Then, skin on, grate the potato using the small side of a box grater. The small size of the potato grating will help you get the right consistency. Put the grated potato into a medium sized bowl.
  2. Fill the bowl with cold water. The water will be cloudy because of the starch on the potato gratings. Swish the potato around, then drain off the water. Repeat until the water runs clear. This is an important step! Rinsing off the starch will make it easier to make your pancakes, as they won't stick and burn in the pan. 
  3. To the bowl of rinsed potato, add the chives, 1 tablespoon of olive oil and a sprinkling of salt and pepper to taste. 
  4. Heat a medium sized, non-stick pan over medium heat. Add 1 tbsp of olive oil and half the butter. Wait for the oil and butter to heat up (butter should not be sizzling or browning, merely gently foaming). Once the pan and oil/butter are hot, add about a 1/3 cup of potato chive mixture to the pan, form into an approx 2" across round. Make sure there aren't any large holes in your pancake. Gently press down with your spatula to achieve uniform, thin pancake. 
  5. Repeat until your pan is full (don't overcrowd, though I never put more than 4 in a large pan).
  6. Cook over medium heat until you notice the top of the pancakes are becoming more translucent and the bottom side of each on is lightly golden brown. Flip and cook until the bottom is golden.
  7. Remove to warmed plate in the oven. Repeat for a second round of pancake. I can usually get about 8 pancakes out of one large potato.
  8. Fry or poach eggs to your preferred level of doneness. I like mine fried, with runny yolks. 
  9. Plate eggs and potato 'pancakes', one egg on top of one pancake. I sometimes make some cooked spinach and add that inbetween the pancake and egg. Enjoy!

Sunday, January 11, 2015

Posole Verde

I've been back in the U.S. for the holidays for a few weeks now and tonight we're making one of my favorite meals. Posole Verde. I've already written up a recipe for Posole Rojo here. Many Mexican restaurants serve an orangey, red chili pozole, but I prefer the spring green, tomatillo version - when given a choice between a red or green sauce, I always choose green.


Pozole is pork and nixtamalized corn stew. First you make a delicious tomatillo and poblano pepper soup base, thickened with raw, green pepitas that give a creamy mouth feel. The pork is browned and then stewed in the soup until it falls apart, then buttery tasting hominy is added part way through, creating a hearty meal.


I like to add a small dollop of sour cream on the soup, and serve with corn tortillas, slices of avocado and limes, and chipotles on the side. Mmmm.


Ingredients:


For the stew:
3-4 pounds of well marbled, boneless pork ribs, cut into approximately 1 inch cubes and trimmed of excess fat
2 large cans of hominy, drained and rinsed
2 tetrapak boxes of chicken or pork broth
1 medium sized, yellow onion, diced fine
4 cloves garlic, minced
2 bay leaves
1 ½  tbsp Mexican oregano
½ tbsp cumin
Salt

For the soup base:
20 medium sized tomatillos cut into quarters or eighths, roughly all the same sized pieces
1 medium sized yellow onion, diced (medium sized, but leaning toward the smaller side)
5 cloves garlic, chopped
1 - 2 serrano peppers, cut in half
3 poblano peppers
½ cup of chicken broth
3 tbsp olive or corn oil
2 tbsp pepitas (shelled pumpkin seeds)
1 tbsp, whole Mexican oregano crushed
Salt

Serve with:
Avocado slices
Warmed corn tortillas
Lime wedges
Cilantro, rough chopped
Canned chipotle peppers

Directions:
In a large stockpot, add half the pork and heat the pan to medium-high or high. Heating the meat slowly will help to render the fat out of the meat, making additional oils unnecessary. Sprinkle the meat with a large pinch of kosher salt. Brown the meat and then remove with tongs or a slotted spoon and set aside in a bowl (to collect any juices). Add the other half of the meat to the same pot, salt and brown the same way. Remove to the bowl when browned.


In the same pot, add your diced onion and saute over medium-high heat until translucent. Add the garlic and bay leaves and cook until garlic is softer. Add the crushed Mexican oregano and the halved serrano pepper(s), saute for about a minute.


Tip the meat and any juices that have accumulated into the pot and stir, scraping the bottom of the pot to deglaze. Add the chicken broth and turn heat to medium-high, the pot should be just slowly bubbling, for about 1 hour or until meat is tender. While you wait, make the soup base.


First, roast the poblano peppers. Turn on your oven’s broiler to high. Wipe down the peppers with a mostly dry paper towel, then make a small cut just to allow steam to escape. Rub very lightly with olive oil to speed browning. Place under the broiler until skin is blackened on one side. Flip using tongs.


When both sides are blackened and blistered, remove from oven and place in a makeshift pouch made from aluminum foil so they can steam, making the skin easier to slide off. Leave for 5 minutes, then carefully peel skin off. Remove stem and seeds, if you feel like your peppers are very spicy. Set aside.


In a large, high sided pan add slightly less than 1 tbsp of olive oil, swirl and heat over medium high heat. Add half your cut tomatillos and halved serrano pepper, add a sprinkle of salt and cook until liquid has accumulated and all tomatillos and peppers are soft. About the consistency you’d expect of a roasted tomato. Remove to a different bowl and repeat with the other half of the tomatillos, removing them to the same bowl as the others when cooked.


In the same pan, add the rest of the olive oil (it should be a little more than 1 tbsp left after the second batch of tomatillos). Heat over medium heat and add the onion. Saute until translucent, add the garlic and pepitas and saute until garlic is soft and pepitas are mildly toasted.


Now we liquify it. Put the softened tomatillos and serrano pepper plus all their juices into a blender or food processor and whirl until liquified. Add one roasted, peeled and seeded poblano pepper at a time to make sure the sauce is uniform. This is also when you should add the Mexican oregano, some salt to taste and half the chicken broth. Pulse and beware of whirling on high for too long. The oil used to saute the ingredients can make the sauce cloudy looking and frothy if whipped too much because it emulsifies. When liquid, add back to the pan with the onions, garlic and pepitas and cook until it is just slightly bubbling. This helps to blend the flavors.


Sauce should have the mild sweetness and sourness of the tomatillo, a light kick of spice on the back of the throat, and a silky mouth feel. If too sour, add a small pinch of baking soda. If more spice is desired, add part of another serrano pepper to the mix and lightly spin in the food processor once more.


By now, the pork should be tender and able to be cut with a spoon or easily pulled apart with two forks or your fingers. The broth should be slightly reduced and thickened with the browned juices we deglazed earlier and more rendered fat from the pork. If this fat bothers you, you can wait for the broth to cool and skim off the top, but this requires an EXTRA day of waiting, and honestly it adds a delicious silkiness to the stew.


At this point, add the drained and rinsed hominy, turn the heat up to a busy, but not rolling boil. Add a ladleful of green sauce at a time until you reach the desired ratio. I add all of it myself, as I love tomatillos and I like it to be stewy.


Cook until hominy is nice and soft, about 10 minutes.


Serve with lime wedges to squeeze into the soup, a sprinkle of freshly chopped cilantro and warmed corn tortillas. I’d highly recommend pozole pork tacos, which are made with the pork and hominy from the stew in a corn tortilla with a little sour cream, a little chipotle and a few slices of a slightly firm avocado. Delicious.

Sunday, October 12, 2014

Mock Rojo Pork Posole

It's fall here in Beijing. That means sweater weather, and soup dinners, both of which I love. Unfortunately, it also means grey days. Grey with smog. Not a little bit of smog either. Smog that sits in the streets, smog that you can taste in your mouth and feel on your tongue.

Usually, I fit all my grocery shopping in on the weekend, but the pollution and chill have made me loathe to leave the house. I'd rather stay inside with my air filter on, reading a book and drinking smoky Oolong tea all day. Or knitting while catching up on my shows on Netflix.

This pork stew is what happens when it's 5pm on a grey Sunday night and I haven't left the house or gotten groceries.  I want something warm and tasty, something easy, cheap and pretty fast. If it gives me leftovers for Monday night and I can add Mexican flavor to that list, well... I'm all over it.

Living in Beijing makes authentic Mexican tastes hard to come by, not to mention ingredients. I didn't have the larger, fruitier tasting dried peppers that Rojo Posole usually calls for, so I adlibbed. I didn't have hominy that Posole calls for, so I adlibbed. Substitution and flexibility are the mainstays of life around here. I hope you enjoy this stew/soup as much as we did.

Ingredients:
2 tbsp corn oil
2 pounds of pork butt, or any cut that is nicely marbled, but not too fatty.
1 1/2 cups of whole, dried red peppers- I used mostly tien tsin, and a few dried bird's eye chiles
1 1/2 tbsp raisins
1/2 cup pepitas (peeled, raw pumpkin seeds)
5 cloves of garlic, peel
1/2  small yellow onion, diced
1 tbsp Mexican oregano, hand crushed (it truly makes a difference if it's Mexican or not)
1 fresh ear of corn cut in half and boiled briefly, or a can of corn (not creamed!!), drained
1 can kidney beans, not drained
1 can of whole, peeled or diced tomatoes
Chicken boullion- enough of whichever brand you like to make 5 cups of broth
Salt to taste

Directions:
30 mintues before you begin cooking:

  1. Put a dry pan over medium high eat, and add the peppers. Briefly toast peppers, stirring frequently, and taking the pan off the heat when you begin to smell a toasty pepper aroma- maybe 2 minutes.
  2. Bring four cups of water to a boil, add the peppers and raisins, then turn off the heat. Allow the peppers to sit in the water reconstituting for 20-30 minutes. 
Make the broth base:
  1. Once the peppers are softer, add half the peppers and raisins to your blender with half of the chile water and the remaining clove of garlic. Puree.
  2. Add the can of tomatoes to the blender and the pepitas, and puree until pretty smooth (pepitas will cook during the next stage and small pieces will add body to the soup, rather than being crunchy). 
  3. Add your boullion and remaining chile water, blend. 
  4. Now taste- it should be spicy, but not so spicy you can't tolerate it. The tomato should add a little tang, but not too much. The boullion should add salt, but not too much salt. Pepitas add body and calm spiciness. You shouldn't be able to taste the raisins at all, they are just meant to add a little bit of very subtle sweetness to make up for the lack of real, smoky, deep, fruity tasting Mexican peppers. If you can tolerate it,  I highly recommend adding the rest of the raisins and more peppers. Adjust the broth base to your liking, keeping in mind that you will add more water to the final soup. It should be potent, not deadly spicy. 
Begin the soup:
  1. Cut the meat into 1" cubes, pat dry with a paper towel, then salt.
  2. Heat a large pot over medium-high, and add the corn oil. When the oil is warm-hot, add half of the pork, and brown. Work in batches to brown all of the pork pieces, making sure not to crowd the pan. - While you wait for pok pieces to brown, set up your blender or food processor and get a ladle. 
  3. When all the pieces are browned, remove to a bowl with a slotted spoon or tongs.  
  4. Add the diced onion and 4 of the cloves of garlic, roughly chopped, to the same pot, using remaining oil and pork drippings to saute onion and garlic until soft. Add the Mexican oregano and stir.
  5. Add the pork back to the pot.
  6. Add the soup base to the pot and add enough water to fully cover the pork. 
  7. Bring soup to simmer and cook for 40 minutes, or until pork is tender. 
  8. When pork is tender, add the drained corn and the can of beans, liquid and all. Bring soup to a boil just to heat corn and beans through. 

Serve with:
Sour cream, chopped cilantro, warm flour or corn tortillas, chipotles, fresh pico de gallo and of course, Mexican pickled onions.

Saturday, January 11, 2014

Pasta Emily

This recipe comes from a Sunset Magazine Recipe Annual cookbook from the 1989. I won't lie - a lot of 80's cookbooks give me the willies. Weird arrangements, odd garnishes, remnants of 'haute cuisine' elements from the 50's, like aspics. Pasta Emily and its variations, however, are simple, tasty gems.

The recipe is found in the March section of the annual, with the heading Pasta for Breakfast because they include, you guessed it, eggs. I've never had it for breakfast, but I don't think it'd take much convincing for me to try it. I make this regularly for lunch or dinner because I usually have all the ingredients on hand, it's a one pot meal and it's very fast. It always hits the spot. The Man and I split a recipe with a little leftover (if he's not completely ravenous that day).

I grew up with this recipe and only recently looked at the actual printed directions in the book. I've never seen a more adorable set of recipe variations; there's a Pasta alla Mama on which the others are based, Pasta Papa, Pasta Maxwell and Pasta Emily- a whole pasta family! My father and I just recently made one of the other members of the family, Pasta Papa, and it was different, but equally delicious. I'll include some of the other variations' ingredients below... just to keep the whole family together. 

 Enjoy!

Pasta Emily
from Sunset Magazine's Sunset Recipe Annual: 1989 Edition

Ingredients:

3/4 pound spaghetti (I love it with linguini)
3 tbsp butter or olive oil (or a mix)
3 cloves garlic, minced
1 medium-large red or yellow onion, chopped
2-3 eggs, beaten (I generally do 2)
3-5 tbsp grated parmesan cheese (optional, and delicious)
1 or 2 tomatoes, diced
1 avocado, diced
a bunch of cilantro, chopped

Directions:

1. Put large pot of salted water on to boil and cook pasta until al dente. Drain.
2. In the same pot, melt butter or add oil over medium high heat. Add garlic and onion and saute until soft, about 1 minute. 
3. Add drained pasta and mix well, aiming to coat the pasta with your hot butter or oil.
4. Add eggs and cheese if using, stir to coat pasta and cook until eggs are set, about 1-2 minutes. (Don't over cook the egg, ew.)
5. Add tomato, avocado and cilantro and stir quickly, then take pan off of heat. Season with salt and pepper and eat!

I eat mine with lots of pepper flakes on top and extra cilantro. Yum!

Bonus Variations:

Pasta alla Mama includes everything in Pasta Emily up to the parmesan cheese, then adds parsley.

Pasta Papa is a heart-clenchingly delicious concoction of 2 links hot italian sausage crumbled, 3 slices bacon chopped into pieces, 3 garlic cloves, 2 tbsp chopped green onion, 3 eggs, chopped parsley and parmesan. It's amazing!

Pasta Maxwell includes everything in Pasta alla Mama, then adds chopped smoked salmon and thinly sliced green onion. Mmm!

Sunday, October 27, 2013

Mima's Warm Red Salsa

Ingredients:
3 peeled tomatoes, chopped roughly
1/2 an onion, diced
5 cloves of garlic, minced
2 large bay leaves
3-4 small, dried red peppers (or large red pepper flakes if you have no blender)
Olive oil
Mexican oregano
Salt
Chicken broth or water (if the tomatoes are pretty dry)

Directions:
1. Heat a medium sized saucepan over medium heat and add the peppers (or pepper flakes) . Toast them briefly, maybe 2 minutes, or until they've very slightly browned. Take them out of the pan and set them aside.

2. Add 2-3 tablespoons of olive oil to the pan. Add the onion and saute until translucent, then add the garlic and saute until softened. About 1 minute. Make sure to lightly salt the onion and garlic. Add the bay leaves. Meanwhile, use a knife to cut up a the peppers into pieces.

3. When the garlic and onion are sauteed and fragrant add the peppers (or pepper flakes) and diced tomato and continue sauteinng. The goal is to cook the tomatoes down to a point that you can crush them fine. If they seem too dry to crush and still be a sauce, add some water or chicken stock.

4. Once the tomatoes are saucy, and the peppers have been softened and broken up into smaller pieces you can either a) blend it in a blender for a smooth sauce or b) leave as is and spice with as much oregano and any extra salt needed.

Enjoy.

Thursday, October 3, 2013

Eggplant & Chickpeas with Rosemary & Cumin

You will need:
1 smallish eggplant, diced into smallish cubes
4 cloves of garlic, minced
1 can of chickpeas, drained
1 can of diced tomatoes, or about 2-3 tomatoes blanched, peeled and chopped
2 cups uncooked spinach, roughly chopped (OPTIONAL)
1 tablespoon of cumin, or to taste
1 tablespoon of rosemary, or to taste
2 tablespoons oil (olive oil is preferred but not essential)
Salt and pepper

How to make it:

First, cut up all of your ingredients. Blanche and peel the tomatoes, cut them up. Cut up the eggplant, skin and all, then place in a bowl and drizzle the olive oil over, toss to coat eggplant evenly. Peel and mince the garlic. Open your can of chickpeas and drain them.

Saute the eggplant in a large pan until starting to become translucent and brownish, about 5-8 minutes over medium heat.

Add garlic, stir around and saute over medium heat for another 2 minutes.

Add most of the spices, reserving a little to add at the very end to add a fresher flavor.

Add the chickpeas and saute until softer, about 4 minutes.

Add the tomatoes and saute until it's not soupy or very wet anymore.

If you're adding spinach, you can add it now and wait for it to wilt and cook through.

Add the remaining amounts of spices, stir and serve! We ate it with crusty bread, breaded pork chops and salad.

Saturday, March 30, 2013

Italian Garlic Chicken

Here is a quick post for a weekday dinner. When I was young, I refered to this chicken simply as 'crispy chicken' for years. From that name, it sounds like it'd be fried chicken, which it is not. It's not breaded at all, but still delivers that satisfying, salty crunch in each bite. The skin turns golden brown and translucent, and yet each mouthful is succulent and moist. I love this chicken and, as with many things I've posted so far, it is one of the dishes I made frequently in college. It's cheap, it works on any cut of chicken with skin, but is especially delicious on thighs and drumsticks. It is composed entirely of things you should have in your kitchen already and is baked, making it an easy dish to throw together and then go about doing your laundry or watching that movie. For a real college throwback, serve with rice-a-roni. Or, have a nice salad and some crusty bread for a nicer, easy meal.

Ingredients:
4-6 chicken legs, thighs or breasts, skin on
3-4 cloves garlic, minced
1/2 cup of olive oil
3 tablespoons Italian seasoning
salt and pepper

Directions:
1. Preheat oven to 350F. Put everything in a gallon sized plastic, ziplock bag and shake it around. Use your hands through the bag to make sure each piece of chicken is thoroughly coated. Allow to marinate in the refridgerator for 15 minutes to 1 hour.

2.  Line a baking sheet with foil,  place each chicken piece on the baking pan as even spaced as possible.

3. Bake in the oven until crispy, golden on the outside and juices run clear when one piece is pierced with a knife. About 30-45 minutes.

Note: I find that ovens can actually vary a lot regardless of exact temperatures set. Your goal here is to cook the chicken all the way through at about the same rate the skin needs to crisp. To do this, you'll need to have it at a medium-low enough temperature for a little bit to cook it through. Once cooked through, feel free to turn your oven up to crisp up the skin.

Enjoy!

Sunday, March 24, 2013

Chicken & Eggplant Gyros with Tzaziki and Tomato Salad


I constantly crave foods wrapped in breads. Tacos and enchiladas usually top the craving list, but just under that is the gyro. I've got no idea how it's actually pronounced, and I can't say I care. It's called many things, kebab in some places, and shwarma in others. I call it a gyro and that's all.

My version of the gyro is... involved. It's a true labor of love when I make it here in China. I make the soft bread that wraps it myself. I cook and season the meat. Make the tzatziki, make a tomato salad to add, and then shred some lettuce and crumble the feta. It takes a special trip to the city to get the mint I need for the recipe. And I do it because it is so worth it.

I'll post a recipe for the bread I make for this another time, as this recipe and its fixings are already rather numerous. You can wrap yours in warm, soft pitas, and that will be just as delicious.

Chicken & Eggplant Gyros with Tzaziki and Tomato Salad


Ingredients:


For the Eggplant-Chicken Mixture:
1 chicken breast
1 large eggplant
2 cloves of garlic, minced
Salt & pepper
Pepper flakes, to taste
1 tsp cumin


'

For the tzatziki:
1 cucumber
3 tbsp plain yogurt
2 tbsp sour cream (optional, replace with yogurt if desired)
2 cloves of garlic, minced
Juice of ¼ of a lemon (about 1-2 tbsp)
1 1/2 tsp dill
Small splash of olive oil
Salt & pepper


For the tomato salad:
1 cup cherry tomatoes, sliced into rounds
½  a medium red onion
1 tsp olive oil
½ tsp red wine vinegar
Salt & pepper
Fresh mint, about 1 tablespoon chopped


Directions: 
NOTE: I've grouped directions by which aspect of the gyro it makes. Really though, to streamline this process, you should start off putting your eggplant in the oven and your chicken on to boil, then go on to assemble your tzatziki and tomato salads. This will allow your filling to be in the works while you make the other parts, which come together quickly. Then, they can sit and the flavors can meld while you finish cooking up the chicken-eggplant filling. I hope that helps!

Make the Tomato Salad:
1. Slice the tomatoes into rounds so that they resemble small coins. Thinly slice your red onion, chop the mint. Mix all the ingredients in a bowl together and let sit, allowing flavors to meld for at least 10 minutes. 

Make the Tzatziki:
1. Grate cucumber on the large grate side of a box grater, and put into a medium sized bowl. Add a small splash of olive oil, the minced garlic, and the salt and stir.

2.Add the yogurt and sour cream (if using), and a small amount of lemon juice, then mix. Taste. I like my tzatziki sour, but you should adjust your lemon juice amount to your own tastes. 

3.Now add the dill, a tiny bit more salt, and some pepper. Taste and adjust.

Make the filling:
1.Preheat your oven to 375 F. Slice the top off of the eggplant, then cut through the middle lengthwise. Slice each half into thin slices and arrange on a foil lined cookie sheet. Sprinkle with olive oil and salt, then cook until the eggplant has become more transparent looking.

2.Fill a small pot with water, add some salt and bring to a boil. Drop your chicken in and boil until just cooked through.  Using a slotted spoon, take our your chicken and allow to cool a bit. Then,  either shred or slice the chicken.

3.In a pan, add about 1 tbsp of oil and the two cloves of garlic minced. Saute about 1 minute, then add both the chicken and the eggplant. Sprinkle the other seasonings over this mixture and cook until heated through and some of the moisture from the chicken and eggplant has gone. 

Assemble:
Warm your bread of choice. If pitas, determine whether you wish to stuff the pita or wrap with the pita. It's a hard decision, I know. Layer your tzatziki sauce, chicken-eggplant filling, and tomato salad into the pita, then top with shredded lettuce and crumbled feta. Enjoy your messy, delicious gyros!

Thursday, December 13, 2012

Green Beans with Bacon and Leeks

For Thanksgiving at my house, we were always kind of rebels. Turkey was never there because my mother didn't like it, and my father had a rare case of recipe ADHD when I was a kid, meaning we tried out something new almost every time. Not that this is bad, it made me the adventurous and adaptable eater and cook that I am today, but I lacked shared food experiences like leftover turkey sandwiches, canned cranberry sauce, and all casseroles in general.

On the few occasians I've atteneded other families' post-Thanksgiving leftover feasts, I've always been impressed with green bean casserole. Now, I really enjoy most other casserole dishes, but the traditional crunchy weird onions on top really make this something I hope to see on others' tables. So this Thanksgiving, while I was considering me and the Man's two person feast, I wanted to make a riff on the classic dish. This dish is an amalgamation of a few recipes I saw, and came about when I threw it together the day before Thanksgiving based on things I had on hand and very little planning. 

Beer-battered leek rings bring the delicious, oniony crunch to the top and instead of a soupy, creamy base, I lightened it (HA! Flavor-wise, at least) with mustard and garlic. Bacon makes it a man's man side dish and keeps tastebuds wanting more.

To whomever believes that holiday food must be overly complicated, I present this recipe for your review.

In total, it has 9 ingredients, it takes at most 20 minutes if prepared from scratch completely and will get you rave reviews. Tuesday, I had Chinese class until 7 o'clock and a potluck to attend at 7:30. I decided to make this because it's easy and has relatively universal appeal. I had to go to the store for a leek and green beans, so I got home at 7:20, and made it to dinner (downstairs mind you) with steaming pan in hand by 7:45. It was gobbled. People had thirds, every morsel was picked from the pan and any remaining sauce was mopped up with bread. This dishes humble presence has been requested at our Christmas potluck dinner and I hope it makes it to your table too. 

Green Beans with Bacon and Leeks
makes about 6 side dish size servings

Ingredients
1-2 appropriately sized bag of cut, frozen green beans **
2-3 slices of thick cut bacon (no maple or pepper bacon here please)
1-2 tablespoons dijon mustard, to taste
5 cloves of garlic, sliced
1 medium-large leek
1 can of extremely cheap beer
1 cup of all purpose flour
3/4 cup oil (something like corn oil with a higher smoke point)
1 tablespoon olive oil
salt & pepper

**quick note: I used fresh beans that I trimmed the ends of and then cut into approx. inch length pieces. I'd say I used...perhaps a pound of beans? I buy vegetables here from a small, more or less roadside vendor, so I have no way of really measuring quauntity when I buy other than guessing how much I need for how many people I have. Estimate about a 3/4 of a cup for each person, I used slightly less than 6 cups (once trimmed and cut) for the 6 people I was serving it to.

Directions

1. If using fresh beans, trim ends and then snap into roughly 1 inch long pieces. Fill a pot with enough water to completely cover (and then some) the beans, bring to a boil and add 1 tablespoon salt. Boil until beans turn bright green, and when fished out, are tender to the teeth.

If using frozen beans, steam or boil according to directions on the bag. You want beans tender and bright, not mushy and sad. Keep this in mind. 

2. Slice the white and very light green parts of your leek into thin slices, no need to separate each little ring. Pour half the can of beer into a bowl, and the flour into a separate bowl. Add the oil to a frying pan and heat until water flicked at the oil spits. 

In batches, first put leek slices into the beer, then dip in flour, then fry until golden in the pan. I usually just put all the leeks into the beer, then dip into flour as I switch the batch. 

Remove fried leeks to a paper towel lined plate and lightly sprinkle with salt. When finished, dump (...or drink) the last of the beer in the CAN (don't drink the stuff in the bowl, gross), then pour your frying oil into the can for easy disposal later.  Feel free to leave a little oil in the pan, no harm done. 

3.  In the same pan, fry the bacon until it is nicely firm but not crunchy. Take out, dice and set aside. Either remove bacon fat (...how could you?!) and add 1 tablespoon olive oil, or leave the bacon fat for added flavor.

4. Heat oil or fat over medium-low heat. Add sliced garlic to the pan and saute until fragrant. Throw in your drained beans and bacon. Stir around to coat beans in garlicky goodness. Add 1 tablespoon of dijon mustard to the pan and stir to coat. Cook for 1 minute, then taste. If you really like mustard, and I do, add another tablespoon of mustard, or as much or as little as tastes right to you. Make sure to cook another minute after adding to take the bite out of the mustard. 

5. Add cracked pepper, stir and plate. Top with fried leeks and you're done! Enjoy and Happy late Thanksgiving!

Friday, May 11, 2012

Kaluha Tres Leches Cake

The was hatched when I decided I wanted tiramisu on my birthday. Living in rural-ish China, however, made that difficult. I was bound and determined to have that taste on the 24th celebration of me breathing air, but I couldn't find mascarpone. So, I retreated and went with plan B - tres leches cake.

Then thought, 'Wait, no, I want COFFEE tres leches!'

Then, 'Wait no, I want BOOZY, coffee tres leches!'

Thus, this fortuitous Frankenstein of a cake was born.

And, wow...... that is all I can say.

Wow.

This cake is good. It is decadent but not too sweet, moist but not soggy, and...you should probably make two. Or three. Do not make just one for a party. I took this to my very small birthday party. There were 8 people there, and we finished this cake. Everyone had seconds.

What's even more amazing about this cake is that it's BETTER the next day. Yes. I said better. This isn't a cake that'll dry out and become a vanilla flavored foam mattress with chalky frosting. No. The next day, this is as dense and moist as it was before, but with the benefit of all of the flavors melding and settling. I'd even say you should make this the day or night before and let it hang out in your fridge (unfrosted) until you're ready to go to the party. (Maybe just make this for your own party though... you might upstage the birthday boy/girl.)

Easier, in my opinion, than a full on tiramisu, but delivering a similar taste combo, this cake comes together in a mere hour and a half, most of which is just baking time. The ingredients are cheap, the presentation is simple, yet effective, and it is bound to please.

Just try it, you'll like it!

Kaluha Tres Leches Cake

Ingredients:
For the Cake
1 cup All-purpose Flour
1-1/2 teaspoon Baking Powder
1/4 teaspoon Salt
5 whole Eggs
1 cup Sugar, Divided
1 teaspoon Vanilla
1/3 cup Milk

For the Soak
1 can Evaporated Milk
1 can Sweetened, Condensed Milk
1/4 cup Heavy Cream
2 shots of Kaluha

Whipped Cream Frosting
1 pint Heavy Cream, For Whipping
3 Tablespoons Sugar
Cocoa powder (for dusting)

Directions:

Preheat oven to 350 degrees. Spray a 9 x 13 inch pan liberally until coated.

Combine flour, baking powder, and salt in a large bowl. Separate eggs.

Beat egg yolks with 3/4 cup sugar on high speed until yolks are pale yellow. Stir in milk and vanilla. Pour egg yolk mixture over the flour mixture and stir very gently until combined.

Beat egg whites on high speed until soft peaks form. With the mixer on, pour in remaining 1/4 cup sugar and beat until egg whites are stiff but not dry.

Fold egg white mixture into the batter very gently until just combined. Pour into prepared pan and spread to even out the surface.

Bake for 35 to 45 minutes or until a toothpick comes out clean. Allow to cool.

Combine condensed milk, evaporated milk, and heavy cream and kaluha in a small pitcher. When cake is cool, pierce the surface with a fork several times. Slowly drizzle all but about 1 cup of the milk mixture—try to get as much around the edges of the cake as you can. Use the leftover cup somewhere else - make white russians or add it your coffee next weekend.

Put the cake in the refrigerator and allow the cake to absorb the milk mixture for at least 30 minutes, but remember this gets better with time, so allowing it to sit for a few hours is best. To ice the cake, whip 1 pint heavy cream with 3 tablespoons of sugar until thick and spreadable.

Spread over the surface of the cake. Sprinkle grated chocolate or cocoa powder on top - maraschino cherries are also fun. Cut into squares and serve. Enjoy!


Sunday, May 6, 2012

Tuna Noodle Casserole

When I was growing up, I was the kid in the lunchroom pulling out liverwurst and cream cheese sandwiches. Leftover pate and crackers from a picnic dinner. Large sandwiches with munster cheese. Yoplait yogurts (the height of yogurt fashion then) and little Babybell cheeses. I loved it, and I wasn't sure what the big deal was when friends would make gagging noises and react with melodramatic squeals of 'Eww!'. It was just what we ate at home, didn't everybody eat this stuff? Didn't they all eat olives and capers and anchovies? Caesar salad with 1 minute eggs?

Apparently not. As I'm getting older, I'm appreciating more and more the rich food culture my parents passed on to me. Really, it made for a very balanced diet as a child. I didn't like cake. I didn't like PB & Js, fish sticks or corn dogs. I hated Kraft macaroni and cheese. But, I loved brussel sprouts, sauerkraut, hot salsas, mustard, cheeses, pickles, tomatoes with pepper and blue cheese. I like garden fresh peas and blackberries. I liked eating chives from the garden. 

One day, though, I was staying late at the babysitter's. My parents had some meetings to go to, so my brother and I had dinner with Miss Karen. She made tuna noodle casserole. And let me tell you, it was a revelation. I have no idea why this comfort food won out over the others, but it did, in a big way. I already loved tuna salad, but what was this. Hot tuna? With...bread crumbs and.... noodles! Mmm!

Her version was likely made with Campbell's Cream of Mushroom soup, which was my go to recipe throughout college. I loved the Stouffer's microwavable tuna noodle casserole, too. But, now that I live in China, there is no Campbell's soup or Stouffer's. All I have are the raw ingredients. I've tried many recipes, but they never had the right umami level that the likely MSG laden pre-made versions had. Finally, in desperation I made this improv version one night. It is rich in umami, and captures the pre-made versions' balance of flavors, but goes beyond it. Now it's the only version I'll make. It is not as fast to put together as the Stouffer's or Campbell's versions, but if you are limiting your intake of preservatives and artificial ingredients, this will give you the taste you crave, without the extra unknowns.


Tuna Noodle Casserole
Serves 2-4

For the casserole:
3 thin stalks of Chinese celery, or 1 ½ large stalks, diced
½ a medium red onion, diced
3 large cloves of garlic, minced
1 ½ cups rough chopped mushrooms
2 cans of oil packed tuna
 1 ¾ cups green peas, cooked
1 ½  tablespoons of cooking wine/sherry

½ tsp dark soy sauce
1/3 lb or 160 grams of egg noodles, cooked
2 tablespoons olive oil
1 tablespoon butter
Seasoning or Celery Salt (this is important, I mean it)
Salt and pepper


For the white sauce:
1 clove garlic minced
1 tablespoon olive oil
2 tablespoons butter
3 tablespoons flour
1 ½ cups milk
Seasoning salt


For the topping:
2 pieces of bread toasted until dry and made into crumbs
1 tsp dried thyme
   3 tablespoons finely grated parmesan
2 tablespoons butter

Pepper
Celery leaves chiffonaded


Directions:
        Prep all ingredients into their appropriate forms, meaning do some rinsing, dicing, chopping and mincing. Cook your peas by either boiling them until bright green and juicy or microwaving as per instructions on the bag. Put your cooked peas into a large bowl.

      COOK THE VEGETABLES. In a medium sized pan, melt a ½ tbsp of the butter and add a little splash of olive oil so it doesn’t burn. Heat over medium until the butter is melted, then add your onion and celery. You want to sweat them, not fry, so keep the heat lowish and wait until just before they become translucent to add 2 of your minced garlic cloves. Stir until things are translucent and fragrant (these are aromatics, after all). Salt and pepper them, mix, then add to the bowl with the peas.


In the same pan, melt the other ½ tablespoon of butter and your olive oil. Mushrooms are notoriously moisture hungry, so once the butter is melted and you add the mushrooms, stir vigorously to coat. Continue cooking over medium heat until they start to release some of their water. Now add 1 minced garlic clove, cook for another minute or two, then add your soy sauce and cooking wine. Turn the heat up a little and wait for some of that moisture to cook off. Continue to watch and stir. You don’t want your mushrooms to be dry, you just don’t want all the liquid loose either. You want it in the mushrooms. Once mushrooms are cooked tender and some of the excess moisture has cooked off, transfer mushrooms and any left over juices to the bowl of the other vegetables. 

      Open and drain your cans of tuna, break up any large chunks and add to the vegetable mixture. Lightly seasoning or celery salt the whole shebang…. LIGHTLY!

      Cook your noodles in salted water until al dente. Drain, and add to the vegetable bowl. 

      MAKE THE SAUCE. In the same pan and over medium-low heat, add the olive oil and butter for the sauce. Allow butter to melt and lightly foam, don’t let it get too hot though, or it’ll burn your garlic...which is gross. Add your 1 clove of minced garlic and stir. Turn the heat down if it looks too hot, let it become fragrant. Now, add the flour SLOWLY, mixing all the while. We’re making a classic roux here, and you don’t want lumps, nor do you want it to brown at all, so make sure you watch the heat. Continuously stir as you add the flour. If it looks too dry add a tiny amount of olive oil. Once fully incorporated, stir for another minute to make sure it’s all warm. 


Slowly pour in the milk, stirring continuously and attempting to fully incorporate the liquid. The roux will …seize a little, it’ll look like a failure for the first few minutes. Keep stirring and keep slowly adding the milk and eventually the sauce will set up. If it still looks too dry after you’ve add all the milk, go ahead and add a little more. Once it’s a liquid, cook it for 2-3 minutes over medium-low to thicken it up. Don’t burn it though, be calm. Add seasoning or celery salt to taste and some pepper. Turn off the heat and add about 1 ½ cups of the sauce to the vegetables/noodle/ tuna bowl you have already. 

      PREHEAT your oven to 375F~150C.

      MAKE THE TOPPING. Toast two pieces of whatever kind of bread you have around until they are lightly browned and very dry. Take them out and let them cool down. Transfer to a small ziplock bag, and crush them into crumbs. Now add your parmesan, thyme and pepper, shake to combine. Melt the butter. Chiffonade the celery leaves, but do not add them to the bread crumbs.

      CONSTRUCT THE CASSEROLE.  Put the veggie/tuna/noodle/sauce mixture into an ungreased, oven-proof dish. Glass is nice for this. Top with an even layer of the breadcrumb  mixture, drizzle the butter over the top. I apologize for not having a legitimately sized oven/baking dish size to tell you. I cooked this in two small pie pans. The recipe makes enough to feed 2 pretty hungry people dinner and have a small portion left for lunch the next day. It would probably feed 4 normal people for dinner with sides and no leftovers. I will hazard a guess and say that an 8x8 baking dish would probably suffice as long as it’s a little deep… but I’m not one to say you can’t use cake pans, loaf pans or whatever floats your boat to cook this. Use whatever you have that’s at least about 1 1/2  inches deep and will fit the amount of casserole. I trust you.

      BAKE the casserole for about 10 minutes, you really just want to heat it through, all your ingredients are already fully cooked. When you think it’s warmed through, turn the oven to broil and broil the top until lightly golden brown.

      Take it out, sprinkle with celery chiffonade, and serve piping hot. I like this topped with a good amount of pepper flakes with a mixed green salad that includes more celery leaves, cherry tomatoes, some blue cheese and balsamic dressing on the side. But that’s just me. Enjoy!

Tuesday, May 1, 2012

Sardine Pasta Puttanesca

The boyfriend is away this weekend, which means everything is my pace all the time. We've had a fair amount of long distance in our time together, so it's only strange for the first few hours he's gone. And though I do miss him, even if it's just for 3 days, I do like to luxuriate in my time while he's off traipsing through the mountains. I like that the Man is active, but sometimes I just need a low key day... or 3.

Last night, I went out with some friends for sangria. Came home to my empty apartment, where I'd left a small light on for myself, and played some music while I got ready for bed. I did an olive oil, honey, sugar scrub on my face and let it soak in while I did the dishes. I'd cleaned the kitchen spotless earlier, and I much prefer doing  dishes in an otherwise clean kitchen.

I woke up early today, made a pot of tea, and then read for a while in bed with the window and curtains open. I could see 4 mountains deep today, which is unheard of. The rained washed away the mists last night.When I got up, I made the bed. It rained hard last night, so I checked on my flowers and plants on the balcony. Hung some clothes out to dry. Put more clothes in the laundry, and then made a very small, meatless version of Eggs Florence for brunch.

Then, for a while I planned my evening baking plan on King Arthur Flour's website, as a friend has a birthday tomorrow and I'll be making her a surprise something. But at some point, 5 o'clock rolled around. And then 5:30. And then it was 6 and I was faintly hungry. I didn't want to go to the store just for me, so I scanned the pantry and threw together a Pasta Puttanesca-esque dish. This was insanely delicious, and a rare treat for me, as the Man is an avid olive/caper/canned fish hater. It's really quick to put together, and it's light but also very satisfying. I'd say make it for a date, because it tastes special (at least to me) but... the ingredient list will give you a good idea about your breath situation post consumption.

Whenever you serve it, know that it's not only tasty, but healthy, as sardines are rich in protein and nutrients like vitamins A and D, and are one of the most concentrated sources of omega-3 fatty acids EPA and DHA, which are very heart healthy! They are low in calories, but keep you feeling full, so are very diet friendly. Plus, because they're on the bottom of the seafood chain, they don't concentrate heavy metals, and they're one of the cheapest, most eco-friendly seafood purchases you make since sardines are plentiful and sustainable! Enjoy!

Sardine Pasta Puttanesca
serves 2 for a light dinner


Ingredients:
300 grams of pasta, any shape, spaghetti or fettuccine are traditional, but I made mine with spirals
2-3 slices of thick sliced, raw bacon, chopped
1/2 a medium red onion, diced
2 cloves of garlic, minced
1 can of sardines packed in oil
1/2 cup or about 20 green olives, pitted and smashed
2 tbsp tomato paste

Directions:
1. Put some salted water on to boil. Turn on some music you like, I prefer something Spanish. Once al dente, drain, reserving 1/2 cup of the water.

2. In a medium sized pan, saute your chopped bacon over medium high heat. Once some fat has rendered, add your onions and cook until almost translucent.

3.Add the garlic, olives and 2-3 sardines with their oil, and cook for about 3 minutes to heat through and meld flavors, breaking up the fish as you go. Add the tomato paste and enough water to make a light sauce, not too wet, just not dry. Thrown your cooked pasta into the pan and stir to coat. Serve!

This would be equally delicious with:
-spinach added near the end to just wilt it
-a tsp to a tbsp of capers
-kalamata olives instead of green
-parsley added at the end.

Mix it up and try some combinations!

I had mine with a side salad dressed with peppered tomatoes, red onions, feta cheese and drizzled with olive oil and lemon juice, plus some slices of baguette with some extra sardine I had leftover.

Thursday, April 26, 2012

Power Breakfast Smoothie

I am not a morning person. Nor am I a breakfast person. Most days, I tumble out of bed, brush my hair and teeth, pull on some clothes and head out the door with a big to-go container full of a riff on this smoothie. It keeps me full until lunch, is super fast to set up, and also makes me feel like a responsible, non-Lucky-Charms-eating, adult. Woot.

Power Breakfast Smoothie
makes enough for two smoothies (give the other portion to someone you like, they'll appreciate it)

Ingredients & Directions:
This is mostly just a basic idea of how to go about making a normal tasting smoothie that doesn't have a lot of sugar going on. I never add any sugar to mine because all the yogurt in China is already sweetened, I counteract this sweetness with a squeeze of half a lemon in there because I like some zing, but your welcome to put some honey or agave in there if it needs sweetening to you, both of those sweeteners are healthy and yummy!

Hardest part: Get a blender and assemble it in the right order for it to work. Plug it in. (MAKE SURE IT'S SWITCHED OFF FIRST THOUGH!)

In every smoothie I make, there is:

1-2 bananas, depending on how many people I am making it for. 1 banana is fine for 2 people
1/2 cup of plain, dried oatmeal, preferably rolled, but quick will work in a pinch.
a large handful of washed spinach, trust me you can't taste it at all (it's a miracle!)
1 cup of whole milk yogurt with live cultures. Plain would be best, but all yogurt in China is sweetened...
a splash of whole milk
a splash of 100% juice

Here's where you can get funky:
Add whatever other fruit you have on hand. I like my smoothie to be interesting and light tasting, so I go for puckery fruits like pineapple, oranges, mangoes, and peaches. Berry's get lost in smoothies to me, unless you put a ton in, so I just save the berries for more berry-centric things.... like tarts. If all else fails and I don't even have a measly orange to throw in, I always have lemons in the house, and I just squeeze the juice of half or a whole one in there.

Alternately, instead of extra fruit, you could add a tbsp of nut butter for a rich, thick smoothie, if you're into that sorta thing.

I like to add some 100% juice to up my fruit intake, but if you don't have 100% juice, I'd just leave it out. Avoiding corn syrup laden cereal is the goal here for me, so I wouldn't add juice that has it in it either.

If you're feeling bored, throw in some spices. If I've got bananas and peaches in there, I add some cinnamon and trick myself into thinking I'm eating a peach cobbler. If it's bananas and pineapple, cardamom would be fine. In a nut butter and banana smoothie, a tsp on cocoa powder could amp it up a bit.

If you've got a strong juicer/blender, throw in some cut up carrots instead of spinach and add a small piece of ginger, add some cinnamon and a little honey and you'll have a carrot cake like smoothie! Mm!

You could add some flax seeds or a green machine type powder to make it extra good.

And lastly, if you are on a diet, I highly recommend a tbsp of virgin coconut oil. It'll keep you full and satisfied for longer and coconut oil (of the organic, virgin variety, like Dr. Bronner's) is extremely good for you!

Basically, add things that are good for you to get the most out of this breakfast. White sugars, corn syrup-y granola, and diluted juice won't do anything for you, so just stick to whole things as much as possible for this. It'll jump start your day with a serving of fruits and vegetables and get your metabolism working without having to spend 20 minutes cooking something. Enjoy!

Thursday, April 19, 2012

French Toast with Fresh Blackberry Syrup

I am not a sweet foods in the morning kind of person (not including my coffee). I love eggs with cheese and hot sauce and savory, salty things, like bacon, toast, omelets and home fries. One of the few sweet breakfast foods I enjoy is French toast.

When I was a kid, we only ever had wheat and whole grain breads in the house, which drove me crazy. I liked white bread, darnit, and I was embarrassed when my friends made fun of my darker sandwich slices. But on weekends when I had friends sleepover, we would have heaping breakfasts of scrambled eggs, bacon, and custardy french toast dusted with powdered sugar. My favorite topping was a dark, rich purple boysenberry syrup. The toast would be soft and delicious, with oats in the crust and nuts in the interior. I don't care if the origin of French toast, pain perdu, in meant to be made with stale baguettes. French toast is just plain better when made with oatnut breads.

When I stumbled upon a precious, small basket of fresh berries in the market last week, I knew right away that I had to make some jam or syrup so that we could enjoy this rare treat longer. I love making jam in summer with fresh fruits, but this spring treat sure hit the spot.

 This syrup would be superb with sage, some cinnamon or chili powder, but that's your call. It takes maybe 15 minutes to make, and can be on its way while you prepare things for the French toast.

The incarnation of French toast below is not low fat. It is a delicious, special occasion treat that would be perfect to make for guests or someone you love on a Saturday morning.

French Toast with Fresh Blackberry Syrup
serves 2

Ingredients:
For the French Toast:
4-5 slices of oatnut bread, or your favorite bread, slightly stale
2 eggs
1/4 cup of cream
1/2 cup of milk
1 tbsp sugar
1 tsp cinnamon
butter for cooking

For the Blackberry Syrup: (makes about 3 cups)
2 1/2 cup of fresh, rinsed blackberries, stems removed
1/4 cup lemon juice
2 cups sugar
a pinch of salt
2 cups water

Directions:
1. Make the Syrup: In a small (you don't want too much surface area), non-reactive pot, put all of the ingredients for the syrup and turn the heat on to medium. Allow the sugar to melt and give it a good stir.

2. Bring to a steady bubble and allow to cook, making sure to stir the bottom, for 10 minutes. Feel free to go whip of the French toast dip, but keep ears and eyes alert. Jammy concoctions can occasionally foam up, and if you aren't watching, create an enormous mess of your once clean stove. You also don't want the bottom of your syrup to burn, as it'll stick to your pot for eons. You just want to evaporate some of the water, while also fully cooking and dissolving/softening the fruit. When it has thickened, turn off the heat and let it hang out while you cook some of the French toast.

3. Make the French Toast: In a small bowl (again, you don't want too much surface area) beat your eggs with the sugar , cinnamon, milk and cream. Really get it all in there. Cut your bread slices in half diagonally (in this case creating more surface area). Dip each slice into the egg-milk dip and allow it to become saturated.

4. Heat a nonstick pan of medium and add a small pat of butter to melt. I usually just swirl the stick around the pan quickly to ensure it's lightly coated. When the butter is slightly foamy, add two half (or one whole slice) of the bread to the pan. Cook for about 2 minutes on each side (adjusting for your particular stove top) until the bottom is cooked and has some lightly browned spots. Flip and repeat.

5. If you're my dad, you'll have a small baking sheet in a low oven ready to accept the cooked slices of French toast to keep warm. If you're me, you'll have two plate at the ready by the stove, and you'll divide each batch between the two until you're done cooking them.

6. Strain the Syrup: Warm your intended syrup dispenser on the outside with some hot water from the tap. Set a fine mesh strainer (I use a tea strainer) over the top of it and slowly pour your syrup through, using a spoon to squish out excess juice from the pulp. I personally enjoy the pulp, so I really squish the pulp in the strainer trying to only retain the seeds from the final syrup.

Drizzle your French toast with the Blackberry syrup and maybe some of the fresh fruits, dust with a little powdered sugar and enjoy alongside some softly scrambled eggs and crsip bacon!

Tuesday, April 17, 2012

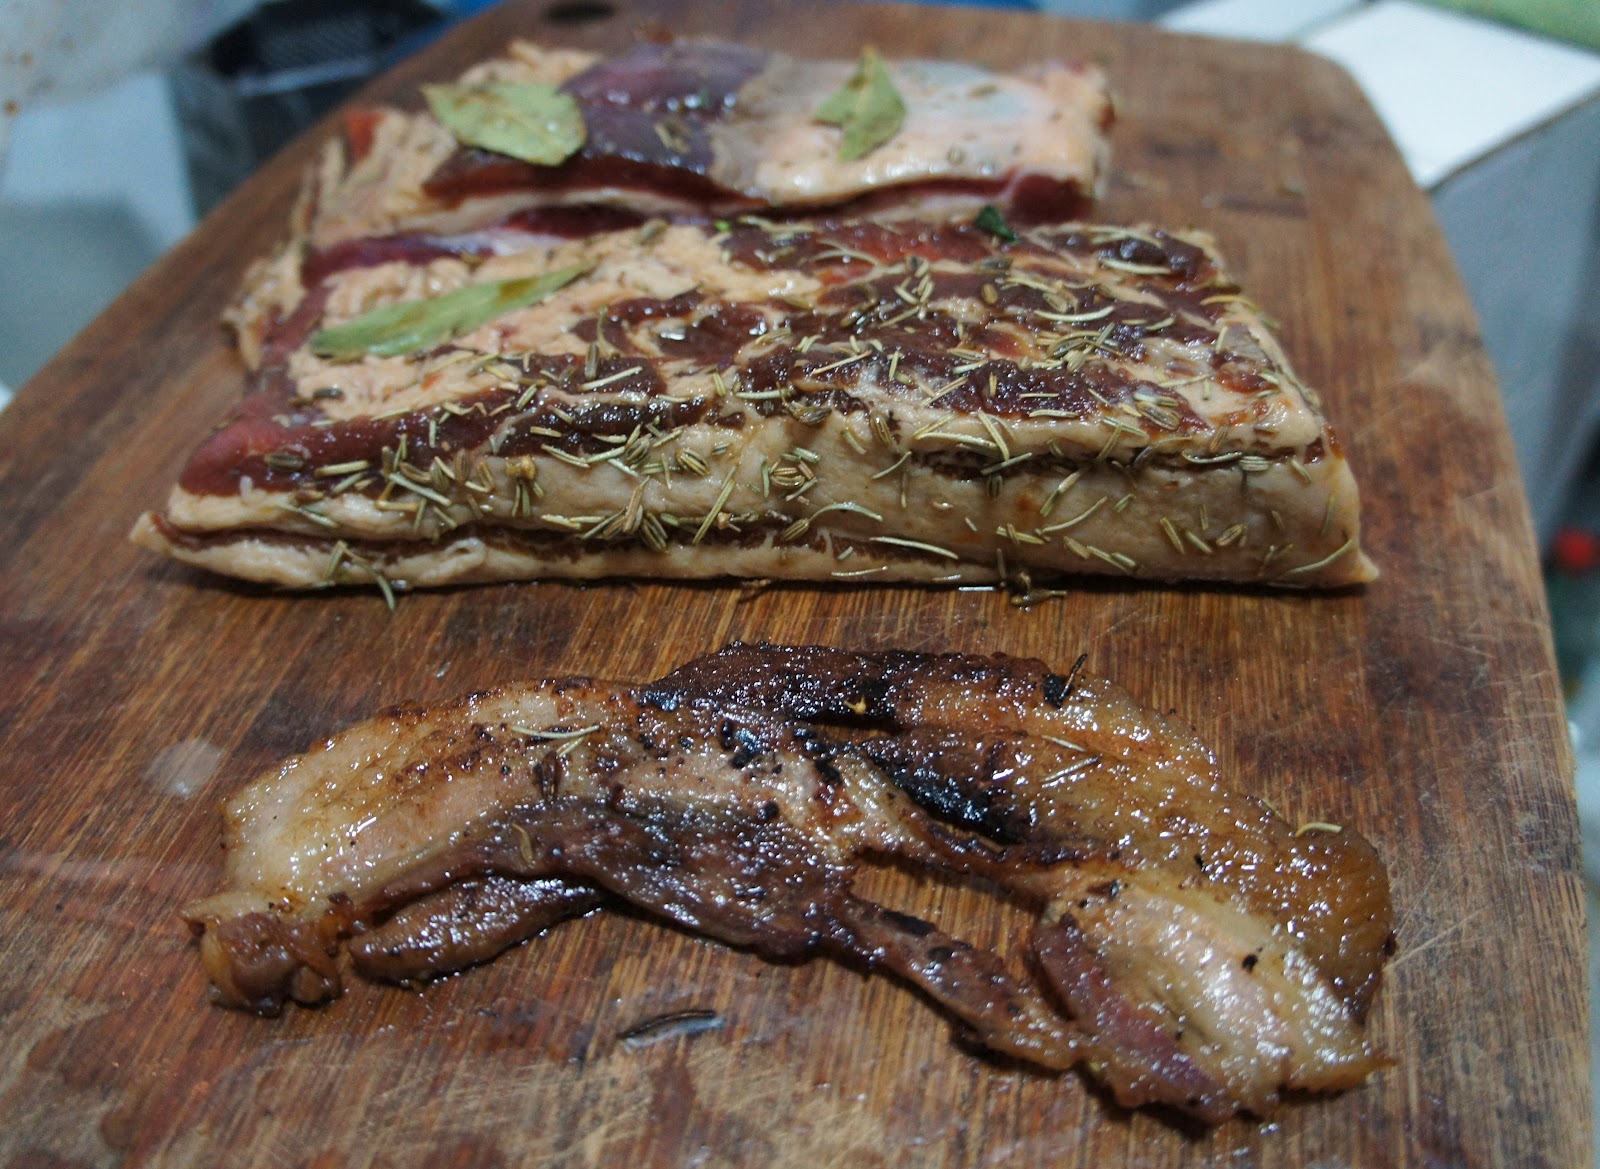
How To: Make Bacon

Picture courtesy of Dylan
Bacon. I don't need to tell you what it is. I don't need to tell you why it's delicious. If you don't like it, you're lying. And if you like it, you owe it to yourself to try making your own.

When I told my dad that I make my own bacon, his first reaction was 'be careful not to poison yourself!!'. Um, yes. That is a concern, I suppose. This bacon, though, is what's known as 'green' bacon, meaning it is unsmoked. Because it's not smoked, it has a shorter shelf life. Fortunately, it's so delicious it barely lasts 2 days once it's done curing.

This bacon is fantastic for breakfast or cut into small pieces and sauteed with spinach. My favorite way to eat it, though, is on a BLT. Because it's not pumped with salt water like the store bought kind, this bacon won't shrivel up and shrink when fried. It stays in its glorious meaty, thick sliced state which makes for really excellent sandwiches when topped with tomatoes, and lettuce, a little mayo and some fresh cracked pepper.

Please do not be intimidated by this. The hardest part of this process is probably finding the right cut of meat. However, if you have a friendly disposition and don't live in a tree stump in the middle of the woods, it's almost guaranteed you can get your hands on some easily. Heck, even if you do live in a stump and are mean as all get out, if you can find a pig, you can make bacon. 

What is curing? Well, in nontechnical terms, it's the process of preserving foods using either salt or sugar. I generally think of dry curing, which involves just dry ingredients. But there is also brining, which involves liquid and it can cure as well.

Is curing bacon hard? No. More primitive peoples cured meat, so if you can use your iPod, you can make bacon.

Don't I need special materials and equipment? No. Seriously. A gallon sized zip lock, a knife and your hands work fine. Oh, and a bowl and a plate. If you eat, it can be made. Some people use nitrates to ensure that they don't get botulism. As long as you use a clean cutting board, clean hands and clean tools, this bacon will be fine. And as long as you eat it within a week or so, you will be fine. 

Doesn't it take a lot of work? No. Literally 6 minutes at the beginning, 2 seconds every day for around 5 days, and then the time it takes to slice, cook and eat every last morsel once it's done.

Here are the steps.

How to Make Bacon
adapted from Saveur Magazine's recipe, here
Ingredients:
2 1/2 lb pork belly, skin on.
1 1/2 tbsp dark brown sugar
1 1/2 tbsp salt (I use regular table salt. If using kosher, go up to 2 tbsp)
1 tbsp crushed dried rosemary leaves
1/2 tsp ground sage
1 tbsp fennel seeds, whole
3 bay leaves
a pinch of red pepper flakes
fresh ground pepper

Directions:
1) Get your hands on 2 1/2 pounds of pork belly, skin on or skin off. Skin on ensures that you'll be the judge of how much fat you keep on there, and it is generally sold this way. Skin off, however, will do.

2) Trim you pork belly into a rectangular piece. Cut off the skin (or rind as it's sometimes called), leaving at least a 1/4 inch of fat.

3) Mix together your dry rub, minus bay leaves.

4) Place the pork in  a gallon zip lock bag. Pour in all of the dry mix, and shake it all around to coat. Use your hands to pat it on there through the bag. Get as much air out of the bag as possible to ensure good surface contact with bacon and dry rub, and zip closed.

5) Put it in your refrigerator, on the bottom shelf, on a plate. Every day for 4-5 days, turn it over to ensure even curing. While you're doing that, poke it to see how firm it is. On the 4th day, take it out, cut a small piece out of the middle and fry it up to try. If you like it, cut it up and eat it! If it's not as firm or salty/sweet as you want, put it back in to cure a day or two more. If it's too salty, put it in a bowl of cool water for an hour or so to dry out some salt, then pat dry with paper towel and eat!

6) Once you have it at the flavor and texture you want, rinse off excess spices, and pat dry with a paper towel. Put it on a clean plate, and put it in the refrigerator for a few hours to 1 day with just a paper towel or plastic wrap loosely covering it. You want to dry it up a bit. After that, pre-slice or leave whole and store in a new, fresh ziplock in the fridge for up to 2 weeks or in the freezer for 3 months.

7) There is also the option of putting it in a very low oven at about 200F~85C wrapped in aluminum foil for an hour or two to firm it up and render some of the extra bacon fat. This is optional, however, as it will only affect the slice-ability of your bacon, and not the tastiness.

Your bacon will last approximately 1- 2 weeks in the refrigerator. Be smart. Your bacon should have almost no scent at all. If it begins to have an odd smell, toss it. If it has a faintly green color, toss it. Neither of these things have ever happened to me, but use your head. Don't be gross and don't risk your stomach!